I was feeling pretty creative at the time. I wanted a look that I cold incorporate all the colors into one look, just for fun! You can always take away the giraffe print and lips and keep the eye lid color for a fun look out.
The looks I will create:
Rainbow Giraffe Print
Rainbow Lips
Rainbow Eyes
(Not sure why I didn't do it in order lol)
:)
Now before we start, apply a lip balm for when we are ready to do the lips. By the time we are ready to work on them, they will be smooth, making it an easier canvas to apply to.
First thing is to apply the eye area with primer. Then start making giraffe shapes with any white eyeliner of your choice. Use any picture of giraffe patterns for reference. Then fill the spots in.
We're going to create a rainbow gradient. Now start filling in the spots with the yellow shade at the top. Stop at about to the point in the picture. I'm using NYX's Single Eyeshadow in "Mellow Yellow."
Now apply a lime green eyeshadow. I'm using a lime green shade from my Coastal Scents 88 regular palette.
Now go ahead with the rest of the colors. After the lime green, I used turquoise, blue, purple, and then pink in that exact order. Make sure all the shades are blended evenly and not over blended. All the colors (except yellow) are from the Coastal Scents 88 Original Palette.
Now you see how fuzzy the edges look? We will take care of that.
Grab a small clean brush with a round tip for hard to reach spots, makeup remover, and concealer that matches your skin tone.
Take that clean brush and and dab it in some makeup remover. Make sure you blot the excess makeup remover from the brush, so it doesn't get messy; we just want the brush to be damp. Then lightly go over the fuzzy parts of the side to make the outline more crisp.
I had an "after" picture, but it somehow got lost in my email :(
Now this is optional: if you still have some fuzzy sides that you can't get rid of, just take a little bit of liquid concealer and dab it on that brush and apply in the crevices to clean up the lines.
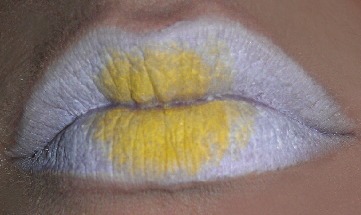
Rainbow Lips
Now that the lipbalm has set (if you have extra residue, just wipe it off to prevent uneven application) Apply a creamy white base to your lips. I'm using NYX's Jumbo Eyeshadow Pencil in "Milk." You can also use the white shade from Makeup Forever's Flash Color Palette.
I'm going to apply the same NYX "Mellow Yellow" eyeshadow to the center of the lips.
We are going to work from the inside to the out with yellow, lime, turquoise, blue, purple & pink.
Blend the colors out evenly.
Line the outer center with the lime green to make the lips look "fuller."
Apply a clear gloss over the lips carefully.
Now for the eyes!
BEWARE: my brows look terrible! haha. Flash really can bring out the ones that you can't see in normal light. :/
Apply a white base. I'm using NYX's Jumbo Eyeshadow Pencil in "Milk." (I abuse this pencil ha ha :])
Once again, I'm applying that same NYX yellow shade to the inner thirds of my lids.
Now, I will apply lime to the center, turquoise to the crease, and blue to the outer V. Make sure everything is blended well. We want to give it a gradient-like effect.
Apply a purple shade to the crease, do not go under the lid. Blend UPWARDS towards the brow bone.
Now apply a light pink shade to above the purple to create a pink "halo." Then apply a white shadow to the brow bone and inner corners. Make sure everything is blended! I can't stress that enough hehe :)
Line your eyes with either a liquid black or metallic blue eyeliner. I'm using Too-Faced Metal-Eyed Liquid Eyeliner in "Twilight" which is a metallic navy blue.
- Line your lower lashline with blue to the outer corners fading into yellow.
- Line the waterline with black pencil eyeliner.
- Apply mascara & false lashes if you wish. I skipped the lashes and used Maybelline's The Falsies Mascara.
My wannabe "sexy" face haha. FAIL :)
Now we are finished!!
I hope you like this!
I just got an HD camcorder for Christmas, so once I figure out how to use it, I will create this look through a video!
So subscribe to my Youtube Channel if you'd like to stay tuned for new videos!
Thanks guys
Love, Ash!